Monday 16 October 2017


Solving the TO3 direct replacement and obsolescence problem


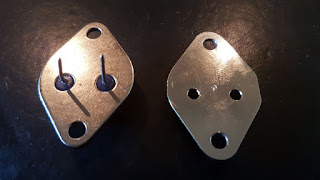
Over the past years I have been faced with a continual problem during repair and refurbishment of older Transistor and FET based power amplifiers and power supplies, so much so that in many cases really rare equipment sometimes does not get repaired and we think twice before taking them on for full refurbishment. This is due to the obsolete nature of the TO3 and its derivative (TO204AA) Transistor, FET and Regulator packages.

Over the past year we have developed a TO3 carrier that will carry a standard D-Pack device and mimic exactly the foot print and mechanical considerations of the TO3, we have found that there are many equivalents to the old TO3 devices available in D-Pack. One good example is IRF244 which can be replaced with a IPB600N25 3G OptiMOS at a cost of US$1.32 (ZAR18.02) and about US$10.00 (ZAR135.00) for the carrier and assembly.

How it works:

We machine a TO3 body from brass flat-bar, Nickel plate the machined housing, find the equivalent D-Pack device, solder it into place in the TO3 carrier housing, connect the pins with wire leads, place it into a precision machined  mold and fill the housing with a 125°C polyurethane electronics potting compound.

Thursday 2 February 2017

The best of 2016


Thank you to my crew, suppliers and clients !


In 2017 we will be finalizing the prototype of the new valve preamplifier, the Hybrid and Analogue One valve power amplifier and other new projects, we also have a lot of production and restoration work lined up. I will post the restoration work as we go along.


Friday 8 July 2016


Valve - Suppliers

Finding valves has become a bit of a problem with Mr. Valve closing down.
After a long search and many emails with some potential suppliers I found an excellent alternative supplier in the Canada, they do all the usual manufacturers Sovtek, Svetlana, Electro-Harmonix, JJ, etc., and we get fast delivery to SA +- 1 week using FedEx.  


Pricing Guide for South Africa Ex works, Ex Vat, Each (ROE US$1 = ZAR 14.8)


KT88 EH                                R1102.-

6550 EH                                R1082.-

6Pi45C EL509                      R1250.-

12AU7   Ecc82                     R  535.-

12AX7   Ecc83                     R  535.-

email me at michael00burger@gmail.com for a quote and delivery.


Tuesday 5 July 2016

Analogue One.


This is a work in progress and not the final diagrams!

Analog One is a new High-End 50W Push-Pull UL Valve amplifier using KT88EH or 6550EH and a Hammond manufacturing 1650K output transformer, I designed it with a un-pluggable driver / preamp stage so I can replace this stage with a high grade Solid-state solution in future. 

I will be posting the prelim and final design as I get to it and will be making changes during the next weeks as I construct the prototype.

Diagram of 1 channel of the UL Amplifier


PCB layout of the UL amplifier, it is designed so I can remove (Un-plug) the valve driver stage and replace it with a solid-state driver stage


Proteus 3D rendering of 1 channel PCB of the Amplifier


Diagram of the PSU I will make a PCB for the components as it makes the final product easier to assemble and work on.


The prelim design of the mains transformer


Thursday 26 May 2016


Gunter Steinhart Bolero R and DVP 2XR RS for Donald.


We will be rebuilding a pair of amplifiers and a preamplifier for Donald. The Bolero's will be getting a full refurbishment and chrome as in the rebuild of my amplifiers (posted on this blog  23.05.2016), Donald also wants a preamplifier that will match his new Boleros, he selected a Gunter Steinhart DVP 2XR from his collection for this and asked me to restyle and refurbish it.

The preamp is a first for me as I always rebuild equipment to the original factory specification, the most I modify to a unit is the paint color or changing from paint to chrome or perhaps a new face or name plate but it is always in-line with the original equipment look and specification. Over the years I have designed and styled many new equipment, I have never been asked to re-style and repackage vintage equipment, but it was a challenge so I accepted.

During the past week me and my mechanical partner Chuck Johnson designed various new concepts for the "New" DVP 2XR, I will call it DVP 2XR RS  (RS= Refurbish re-Style) we settled on a design that embodies the style of the Boleros so it will give a seamless look if placed next to the Boleros, we will be re-using the bottom, front and rear enclosure portions as well as all the original PCB's wiring and layout form the original DVP 2XR, a new chrome top cover, new faceplates, new Bolero-style wood bottom frame and a new instrument plate will be added.

Below is a picture of the original preamp and a Solid Works rendering of the proposed re-style. I will be posting our progress on a weekly basis.


The original Steinhart DVP 2XR         SN: 1619


The proposed option 1 re-styled DVP 2XR RS    SN: 1619RS1


The proposed option 2 re-styled DVP 2XR RS  SN: 1619RS1


So, we have decided to go with option 1.


The wood base

We found the wood for the base frames, this was harder than I thought, as it turns out most wood merchants only sells Chipboard, Super wood, Pine and a bit Meranti. Eventually after some phone calls and a lot of driving around we managed to buy a solid Teak plank from Sawmill Products near Lanseria Gauteng, this guy have a lot of Solid hardwoods.
Teak is not cheap the raw plank is 1520 x 285 X 25mm and cost R175.-


The plan is to manufacture the parts for the base on the CNC and then glue and finish by hand. 


Above is the Teak plank, and a picture of us designing some parts.


Below is the final design renderings complete with all legend's nameplates, switches and knobs, so now drawings will be issued and we will start this build. 
 Final rendering of new DVP2XR RS

Face view of new DVP2XR RS showing the silkscreen legend.


This is what the set will look like the two Bolero's left and right with the preamp in the middle. 


Machining the Teak Base frame, so we got our plank of teak fitted it on the bed of our machine and surfaced the plank to get it flat, we used DeskProto to convert our SolidWorks STL file of the four sides of the frame into a manually flipped 3D milled part with a roughing cut and a finishing cut on both sides. 

The teak machines easily we used a 3mm 2 flute long series solid carbide bit and we only sprayed compressed air on the bit to keep it cool and to clear thee chips.  The Spindle speed was at 18000rpm and the feed rate at 4000mm/min.


The outsides of the frame being cut including the chamfers, 90' corners and dovetail joints all in one operation.


This video is at 1:1 speed and shows the manually flipped part during the finishing cut of 0.09mm per stroke, with this the finished product does net need to be sanded as the finish is as smooth as it can be - ready for assembly and varnish.


The frame showing the milled in dovetail joints in the corners


The frame ready for glue.


The Teak with a clear varnish  - very attractive classic looking wood.


The completed teak frame ready for assembly to the metal-work


The frame attached to the DVP's cradle


Ok so now we are waiting for the Chrome plating to arrive from AE and the final assembly will begin on both the set of Bolero's and the preamp, I am planning to have this project completed by end August as there are two more projects lined up for this year namely the Threshold S150 / SL10 rebuilt and a SEAS high-end rear loaded horn loudspeaker.  


My apologies for the long wait I have been very busy with other business but at last I completed the DVP 2RX and the is the rest of the post. The client also requested we fit a Phono-stage to the preamp, for this task I decided to use my Phonograph Pure MKII, this phono-stage was developed two years ago for a high end professional application so it was ideally suited to this application as it is a very close coupled SMD design providing ultra low noise and very precise reproduction.
I updated the design to version 3IH with a new opamp as the LME49740 has become obsolete (strange as this was a modern opamp to start with),the new opamp I chose was the OPA2134UA. I am very satisfied with this new device - WOW the power supply for the phono-stage remained mostly unchanged I only changed some timing values in the startup delay circuit hence 2IH


As-built Circuit diagram for the power supply


As-built Circuit diagram for the phono-stage complete with MM and MC gain and load switches, I tested with a Micro-Seiki BL101/MA707 Ortofon 2M Bronze and Denon BL103


Top copper showing the very close coupling and symmetrical Left and Right channel layout

 This is the phono-stage complete in its two part 3D machined solid aluminum enclosure


 The picture above gives a good indication of the size of completed phono-stage and the close coupling of the electronics


 The phono-stage and its power supply installed into the original frame pf the DVP 2XR


Thank you Donald for all the patience during this project!


Random picture of the Lab ;)


Monday 23 May 2016


Here is a short video clip of my CNC cutting the new 2 1/2D  Bolero nameplate from brass bar. Video is at 1:1 speed, in this clip the machine is doing the finishing cut, we created the CNC program with Solid Works and DeskProto and the machine is running WINPCNC.


Gunter Steinhart Bolero amplifiers - fully restored and upgraded.

300W Class A valve Mono block's


I purchased the two vintage Gunter Steinhart Bolero mono blocks from a collector in Cape town during December 2015, they were electrically working but many years at the cost had takin it toll on the mechanical parts.
These amplifiers were manufactured in the early 1990's in South Africa by Steinhart Audio, they are equipped with eight Sovtek 6Pi45C valves each and are rated at 300W / 8 ohm.


What's in the name?

At the time we planed the job I wanted to distinguish the rebuilt units from the original so I added an R (for refurbished) into the brass nameplate, this spelled BORLERO instead of BOLERO (it seemed like a good idea at the time), in the future units we will change this to BOLERO R as it falls easier on the eye and does not look like a type-o.


The two mono block's were electrically tested in my workshop and I found them working well except for the power-up delay (pre-heating) circuits that seems to have been modified "butchered" in the past or this may just be a bit of "MacGyver" work on the part of Steinhart Audio. 


I re-designed the circuits using similar components to the original parts, etched the PCB and installed and tested it.

The power-up timer circuit is similar to the original using a NE555 timer in a one-shot configuration.

The new Power-up PCB installed and tested, I added an internal LED so I can see what is happening during the very long two minute delay. It is like watching paint dry..... but  it is Sovtek's recommended pre-heating time.


Photographs showing the rust damage to the metal parts and output transformers, the metal parts were all stripped using an industrial paint stripper liquid for the removal of epoxy powder coating, then sanded with an orbital sander and finally polished with a wire brush. The transformers were removed, sand-blasted with AB grade glass beads and re-varnished with an air drying transformer varnish from WILEC. 


Stripped Metal work ready for professional bright chrome at African Electro-plating.


Newly bright chromed metal work ready for assembly.


Our 4 axis 6 tool machine from HEIZ CNC-Technik (S720T), normally this machine is used for advanced rapid prototyping was used to manufacture various parts including the new brass nameplates.


Machining new nameplates from solid brass bar. I created the CNC program with Solid Works and Deskproto.


I developed the legend Silkscreen in our dark room for printing on the newly chromed faceplates, I used 120T screens and a UV Photo-imageable emulation from AZOCOL and ULANO. The Artworks was designed in DraftSight and printed on transparency for UV exposure. 


Baking the silkscreened parts at 100'C to permanently fix the self etch Safire opaque white ink to the chrome. (This ink is similar to the ink used by stove manufacturers)


Final Assembly of the units ready for the listening room.


The total project ended up costing US$3'225,00 including the purchase of the amplifiers and two new valves.


They sound and look fantastic!


I enjoyed this project and have been asked by a friend to rebuild his Boleros, I have started and will post photographs once completed.

Michael :)


Picture of our workshop in full swing - make me smile.